
Most gate faults trace back to one of two things: power or a blocked safety sensor. Check the breaker first, then look for a flashing or dark LED on the photocells before touching anything else. If you smell burning, see arcing, or the gate frame looks structurally off, stop and call a technician. Plenty of faults are five-minute fixes; some genuinely aren't.
TL;DR:
- Most gate faults stem from power issues or blocked safety sensors, with the most common being tripped breakers, flat backup batteries, and dirty photocells.
- Disengaging the manual release and testing gate movement by hand quickly distinguishes mechanical from electronic faults.
- Replacing failed capacitors, checking wiring, and testing control board diagnostic codes are crucial steps before calling a technician.
- Routine maintenance, including annual inspections and cleaning sensors or lubricating moving parts, significantly reduces emergency breakdowns.
- Professional diagnosis involves detailed checks like amp draw measurements and sensor recalibration, especially for unpredictable or persistent faults.
Table of Contents
- Quick automatic gate troubleshooting checklist to try first
- Is it a mechanical fault or an electronic one?
- Step-by-step fixes for the most common gate symptoms
- When to stop DIY and call a technician
- A simple maintenance schedule that prevents repeat callouts
- Why a professional inspection catches what checklists can't
- Battery backup testing and replacement, step by step
- Testing and replacing fuses and wiring connections
- Diagnosing and troubleshooting control board faults
- A troubleshooting flowchart for typical fault scenarios
- What a service call actually looks like from an installer's side
- How Vicgates gets your gate moving again properly
- Sources
- FAQ
Quick automatic gate troubleshooting checklist to try first
Before assuming the worst, work through these safe, no-tools checks in order. Most gate opener problems get solved somewhere in this list.
- Check the breaker and circuit. A tripped breaker or a dedicated circuit that's lost power is the single most common reason a gate motor stops dead.
- Look at the battery backup LEDs. A dark or blinking indicator usually means the backup battery is flat or disconnected, especially after a power outage.
- Swap the remote batteries. Then test a spare remote or the hardwired wall switch, if you have one, to rule out a dead transmitter.
- Clean the photocell lenses. Wipe both sensor eyes and check whether their indicator LEDs are lit and steady rather than flickering.
- Do a safe hard power cycle. Turn off the mains, disconnect the battery backup, wait sixty seconds, then reconnect both.
- Test the manual release. Disengage it and see if the gate moves freely by hand. That single test tells you whether you're chasing a mechanical fault or an electronic one.
Is it a mechanical fault or an electronic one?
This is the fork in the road for every gate not working properly, and it takes thirty seconds to figure out.
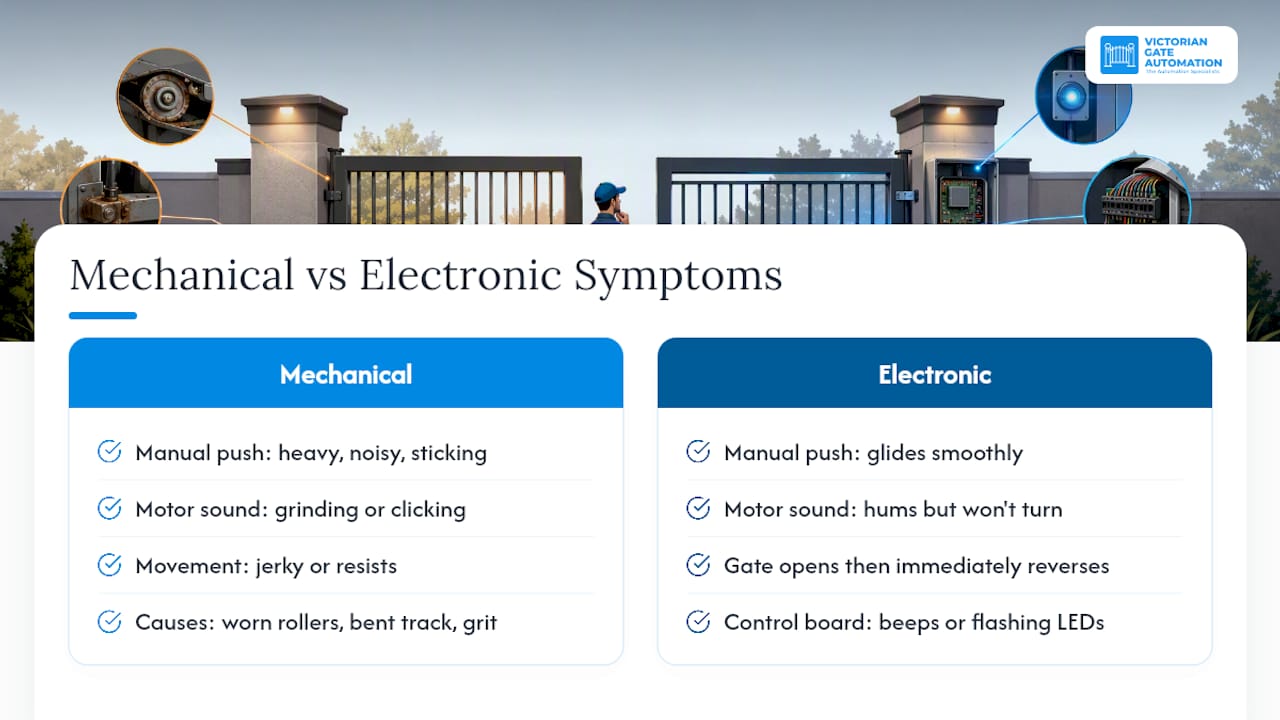
Disengage the manual release lever (usually a key-operated arm near the motor) and push the gate by hand. If it glides smoothly but the motor simply won't engage, the fault sits with the electronics: the control board, a sensor, or the transmitter. If the gate moves freely by hand but the motor won't run, the fault is most likely electronic; heavy, noisy, or sticking movement points to a mechanical problem instead, such as worn rollers, a bent track, or grit in the guide channel.
Listen while you're at it. A motor that hums but doesn't turn often has a failing capacitor. Grinding or clicking usually means a mechanical obstruction or worn gearing. A gate that opens, then immediately reverses, is almost always a safety sensor telling the board it sees an obstruction, real or not. Beeping codes or a flashing LED sequence on the control board are the system trying to tell you exactly what's wrong, if you know where to look.
Step-by-step fixes for the most common gate symptoms
Work through the symptom that matches your gate, not the whole list. Jumping between systems wastes time and risks masking the real fault.
- Power problems: Check the breaker, then any inline fuses on the transformer or control board. A healthy backup battery should read close to its rated voltage under load; if the voltage is significantly lower, it likely needs replacing rather than just recharging.
- Remote or keypad not working: Fresh batteries first, then try a second transmitter to isolate a dead remote from a dead receiver. Check the receiver antenna hasn't come loose or corroded, and re-run the basic programming sequence from your manual if the remote pairs but still won't trigger the gate.
- Tracks, rollers and hinges: Sweep debris out of the track, check rollers for flat spots or seizing, and inspect for a bent rail or worn drive teeth on the rack. Use a light silicone lubricant on moving metal parts and avoid heavy grease pastes, which attract grit and gum up the mechanism.
- Motor and capacitor: A humming motor that won't turn is the classic symptom of a failed start capacitor. This is a legitimate DIY replacement on some systems but involves stored electrical charge, so if you're not confident isolating power safely, this is where to stop and call someone.
- Solar-powered gates: Confirm the panel still gets clear sun (a nearby tree or new shade structure is a common culprit) and check battery voltage under load, since aged batteries and poor sun exposure account for most solar system failures.
Pro Tip: Photograph your control board's LED pattern or beep sequence with your phone before you touch anything. That footage is often the fastest way for a technician to diagnose the fault over the phone, sometimes without a call-out at all.
When to stop DIY and call a technician
Never work on live wiring or open a control enclosure without proper training. Voltage that looks harmless can still cause serious injury, and a lot of gate motors run at mains voltage internally even when the low-voltage side looks straightforward.
Stop immediately and call a professional if you notice a burning smell, smoke, visible arcing, or a breaker that keeps tripping no matter what you reset. The same goes for any structural movement in the gate frame, posts, or fence line. Safety systems like monitored entrapment protection aren't a DIY area either. UL 325 and similar standards require this monitoring, and a sensor fault that won't clear after cleaning and realignment needs a technician's diagnostic gear, not another attempt at guesswork. A qualified installer will run force tests, check insulation and continuity, and pull diagnostic codes the average control panel never displays to the owner.
A simple maintenance schedule that prevents repeat callouts
Routine maintenance measurably cuts down emergency breakdowns, and residential gates typically need regular service visits yearly, with high-traffic commercial or shared driveway gates are recommended to have service visits more frequently, typically twice a year.
- Owner tasks (monthly or quarterly): wipe photocell lenses, clear the track of leaves and grit, apply light lubricant to hinges, and test the manual release still moves freely.
- Visual checks: glance over the control box enclosure for water ingress, insect nests, or loose cabling.
- Installer tasks (annual): force testing against entrapment standards, electrical continuity checks, and capacitor or battery load testing.
Skipping the annual installer visit is the single most common reason simple faults turn into weekend emergencies.
Why a professional inspection catches what checklists can't
Installers measure things a checklist can't: amp draw on the motor, actual capacitance rather than a guess, and force readings against entrapment standards. Those numbers decide whether a fault is a $40 capacitor swap or signals a motor on its way out. An experienced gate service provider can recognize common failure patterns repeated across many properties: control-board faults mistaken for dead motors, limit errors mistaken for broken gears. That pattern recognition is what a one-off DIY check can't replicate.
Battery backup testing and replacement, step by step
A dead or dying backup battery is one of the most overlooked reasons a gate stops responding, especially right after a storm or blackout when the mains supply drops out and the system quietly switches to battery power that's already been sitting flat.
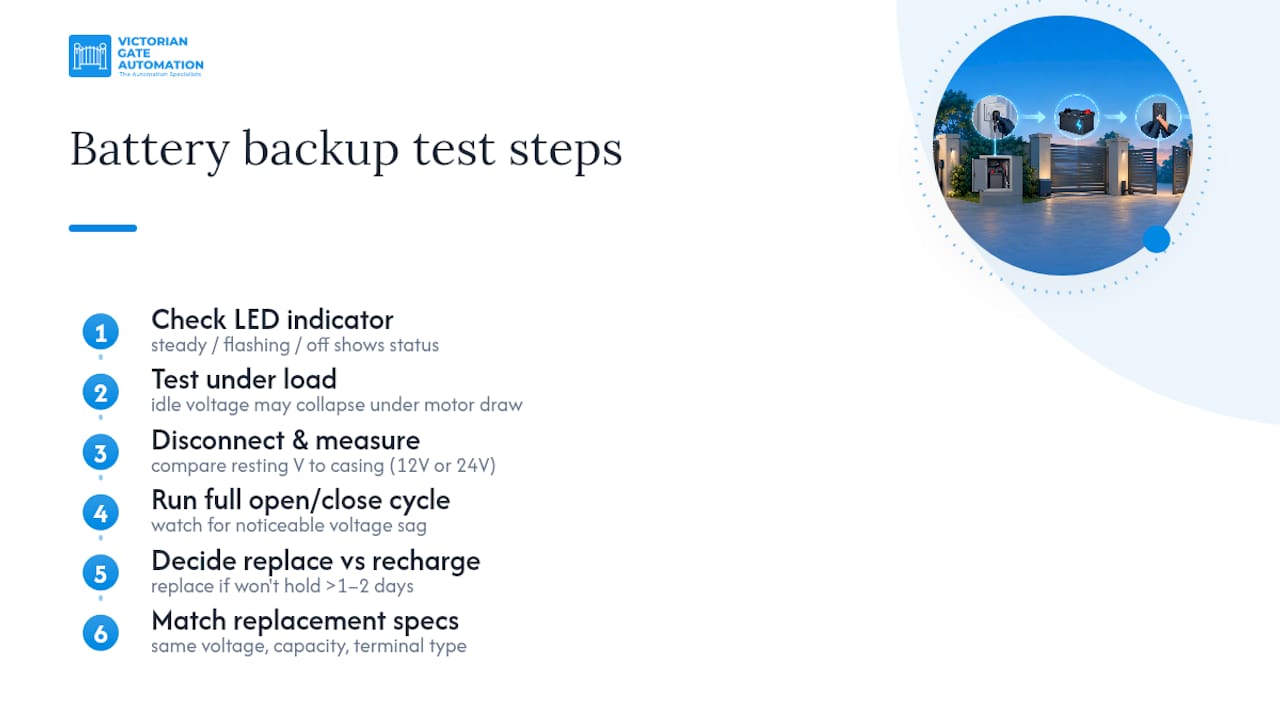
Start by checking the LED indicator on the control board itself. Most systems show a distinct pattern (steady, flashing, or off) when the battery is low or disconnected. Next, test the battery under load rather than at rest. A multimeter reading that looks fine sitting idle can collapse the moment the motor tries to draw current, which is why a "good" resting voltage doesn't guarantee the battery can actually run the gate.
If you're comfortable with basic electrical checks, disconnect the battery, measure its resting voltage against the rating printed on the casing (commonly 12V or 24V depending on the system), then reconnect and watch how it performs through a full open and close cycle. A battery that sags noticeably during operation, or won't hold charge more than a day or two, needs replacing rather than recharging.
Replacement batteries need to match the voltage, capacity, and terminal type specified in your operator's manual. Using an undersized or mismatched battery is a common cause of gates that work fine on mains power but fail the moment there's an outage. Sealed lead-acid backup batteries generally last several years, although lifespan varies based on climate and usage, so if yours has never been replaced and your gate is a few years old, this is worth checking before you troubleshoot anything else.
Testing and replacing fuses and wiring connections
Fuses exist specifically to fail before something more expensive does, so a blown fuse is often good news: it means the board protected itself.
Most gate systems carry at least two fuse points, one on the incoming mains or transformer side, and one on the control board itself protecting the low-voltage circuits running to sensors, remotes, and accessories. A multimeter set to continuity mode will tell you in seconds whether a fuse is intact; a blown one shows no continuity at all. Never replace a fuse with a higher-rated one to "see if it holds." That's how a five-dollar fuse problem turns into a burnt control board.
Wiring connections deserve just as much attention as the fuses themselves, particularly on gates that have been through a few Victorian winters. Check for corrosion at terminal blocks, loose screw connections that vibrate free over time, and rodent damage to cable runs buried in conduit near the base of posts. A connection that looks intact but has corroded internally will often cause intermittent faults, the gate working fine some days and not others, which is far more frustrating to diagnose than a fault that's consistent.
If a fuse blows again immediately after replacement, stop. That's a sign of a short circuit somewhere downstream, not a fuse problem, and repeatedly replacing fuses without finding the short risks damaging the board or starting a fire.
Diagnosing and troubleshooting control board faults
The control board is the brain of the system, and when it's the fault, symptoms tend to look confusing precisely because everything else, power, motor, sensors, can test fine in isolation.
Start with the diagnostic codes if your system has an LED or digital display. Diagnostic codes and current or amp measurements help isolate faults like battery overcurrent, limit errors, or a missing accessory board, and most manufacturer manuals include a full code table worth keeping a photo of on your phone. A board that shows no lights at all despite confirmed power at the terminals usually means the board itself has failed internally, rather than anything feeding into it.
Water ingress is the quiet killer of control boards, particularly in enclosures mounted low or facing prevailing weather. Even a small amount of moisture tracking along a circuit trace can cause erratic behaviour: a gate that works perfectly for weeks then suddenly won't respond, or randomly reverses mid cycle with no obstruction present. If you open the enclosure and see any sign of corrosion, white residue, or discolouration around components, that board is on borrowed time regardless of whether it's currently working.
Board-level repairs and replacements sit firmly in installer territory. Diagnosing a fault down to a specific failed component, and sourcing the correct replacement board for your motor's make and model, isn't a reasonable DIY project once you've ruled out the simpler causes covered earlier.
A troubleshooting flowchart for typical fault scenarios
Run through this order whenever a gate stops behaving, rather than jumping straight to the most dramatic possible cause.
Gate does nothing at all: breaker, then battery backup LED, then fuses, then control board power light.
Gate hums but doesn't move: suspect the start capacitor first, then check for a mechanical jam preventing the motor from turning at all.
Gate opens but won't close, or reverses immediately: check photocell alignment and cleanliness first; this is the most common cause by a wide margin.
Remote doesn't work but wall switch does: replace remote batteries, test a second remote, check the receiver antenna.
Gate moves but sounds wrong, grinding or clicking: disengage the manual release and check the track and rollers by hand before running the motor again.
Intermittent faults with no clear pattern: suspect wiring corrosion or a failing control board rather than any single component.
If you've worked through the relevant branch and the gate still isn't cooperating, that's the point to call a technician rather than keep guessing.
What a service call actually looks like from an installer's side
Have your gate's serial number, the make and model if you know it, and a quick note on what changed right before the fault started. That last detail matters more than owners expect. Storms, recent renovations, or a car reversing into the fence line often explain faults that otherwise look mysterious.
On arrival, plenty of call-outs turn out to be a stuck sensor, a flat backup battery, or a limit setting knocked out by a power surge, all quick fixes once you're on site with the right meter. Keeping up basic maintenance between visits is what keeps those calls quick and affordable rather than turning into an emergency after-hours rate.
— Rhys
How Vicgates gets your gate moving again properly
If you've worked through the checks above and the gate still isn't cooperating, that's exactly where a proper diagnostic visit from Easton Fencing earns its keep. Specialist service providers handle checks a multimeter and a Saturday afternoon can't: amp draw testing, capacitor readings, force testing against entrapment standards, and sensor recalibration done to the actual manufacturer sequence rather than trial and error.

A service visit includes a full safety test of the system, a written quote before any work starts, and clear recommendations on what needs fixing now versus what can wait. Whether it's a tired backup battery, a failing control board, or a heavy wrought iron gate putting extra load on an ageing motor, get in touch through the automation and access control page to book a diagnostic visit and stop guesswork before it turns into a bigger repair bill.
Sources
- What are common automatic gate problems? — BMGI
- UL 325 explanation — Doorking
- Automatic gate maintenance: tips to make gates last longer — CAME
FAQ
What are the most common electric gate problems and how can they be fixed?
Dead remote batteries, dirty or misaligned photocells, tripped breakers, and flat backup batteries account for most faults. Cleaning sensors, replacing batteries, and checking the breaker resolves the majority without a technician.
What causes an automatic gate to malfunction in the first place?
Power interruptions, obstructed or misaligned safety sensors, worn mechanical components like rollers and tracks, and ageing capacitors or backup batteries are the leading causes. Weather, debris, and simple age account for most of the rest.
Why isn't my electric gate opening?
Start with the breaker and battery backup LED, since a power fault is the most common cause of a gate that won't open at all. If power checks out, a blocked or dirty photocell sensor is the next most likely culprit, since the system will refuse to move rather than risk closing on an obstruction.
How do I reset my automatic gate opener?
Turn off mains power, disconnect the battery backup, wait about sixty seconds for capacitors to discharge, then reconnect both in that order. If the fault persists, you may need to follow your manufacturer's specific erase and learn limits sequence rather than a general reset.
When should I stop troubleshooting and call a professional?
Call a technician immediately if you notice burning smells, arcing, a breaker that keeps tripping, or any structural movement in the gate or fence line. Safety sensor faults that don't clear after cleaning and realignment also need a qualified technician's diagnostic equipment.